用CAShapeLayer画一个带动画的进度条
CAShapeLayer的用法
这篇博文介绍了CAShapeLayer的五种用法,先放上项目gif图。
一、画一个带尖角的视图
-
经常会在项目里遇到带小尖角的一个视图。当然我们可以考虑找UI设计师帮我们切出这样一个带尖角的图片,用UIImageView去加载它。不过这样的话有很多不便利的地方,比如说想调一下背景颜色,想改变一下尖角指向的位置等等,都需要重新找我们的设计师重新做图。而程序猿们是轻易不能求人的,so还是让我自己动手实现它吧。
-
其实这个情况在之前我是做过的,之前的项目DEMO。效果图如图:
不过在此我们使用mask属性再做一遍。
-
用mask属性做一下类似上图中尖角的view。
1、首先设计思路呢,是使用CAShapeLayer的category来做这个功能。我们要新建一个category属性:CAShapeLayer+mask。
2、在CAShapeLayer+mask.h文件里,我们要新建一个类方法:
#import <QuartzCore/QuartzCore.h> #import <UIKit/UIKit.h> @interface CAShapeLayer (mask) + (instancetype)creatViewMaskWithView:(UIView *)view; @end -
在CAShapeLayer+mask.m文件里,实现此类方法。通过观察,我们可以用贝塞尔曲线来做这个view。这样的一个view应该有七个点,我们只需要把这七个点用线连起来并设置好填充颜色,就可以得到了。直接放上代码如图。
#import "CAShapeLayer+mask.h" #define rightSpace 10. #define topSpace 15. @implementation CAShapeLayer (mask) + (instancetype)creatViewMaskWithView:(UIView *)view { CGFloat viewWidth = CGRectGetWidth(view.frame); CGFloat viewHeight = CGRectGetHeight(view.frame); CGPoint point1 = CGPointMake(0, 0); CGPoint point2 = CGPointMake(viewWidth-rightSpace, 0); CGPoint point3 = CGPointMake(viewWidth-rightSpace, topSpace); CGPoint point4 = CGPointMake(viewWidth, topSpace); CGPoint point5 = CGPointMake(viewWidth-rightSpace, topSpace+10.); CGPoint point6 = CGPointMake(viewWidth-rightSpace, viewHeight); CGPoint point7 = CGPointMake(0, viewHeight); UIBezierPath *path = [UIBezierPath bezierPath]; [path moveToPoint:point1]; [path addLineToPoint:point2]; [path addLineToPoint:point3]; [path addLineToPoint:point4]; [path addLineToPoint:point5]; [path addLineToPoint:point6]; [path addLineToPoint:point7]; [path closePath]; CAShapeLayer *layer = [CAShapeLayer layer]; layer.path = path.CGPath; return layer; } @end -
在用的时候,我们可以通过导入#import “CAShapeLayer+mask.h”,然后直接调用此方法.
  /**
   *  测试view的mask属性
   */
  - (void)addTestMask
  {
      UIView *view = [[UIView alloc] initWithFrame:CGRectMake(40, 50, 80, 100)];
      view.backgroundColor = [UIColor orangeColor];
      [self.view addSubview:view];
      CAShapeLayer *layer = [CAShapeLayer creatViewMaskWithView:view];
      view.layer.mask = layer;
  }
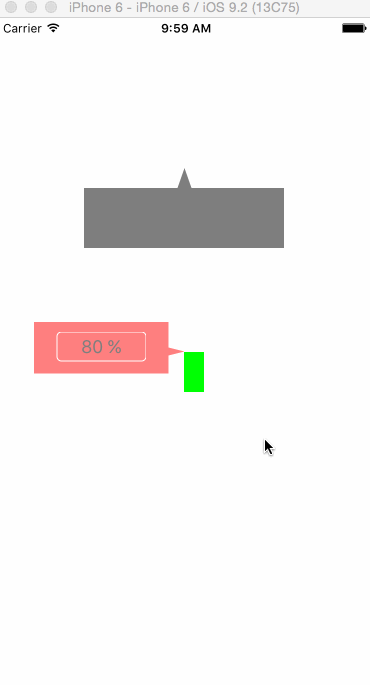
二、画一个胶囊状的音量控制条,可以根据音量大小实时显示
-
这个胶囊状的音量指示条其实也是很简单就能完成了。首先来分析一下结构:我们可以把外面的这个胶囊形状用一个view去加载它,设置一下cornerRadius,设置一下线条,这样我们就可以得到一个椭圆形的内为白色的view;然后再在此view里填充一个layer层,假如view层我们手动设置过clipsToBounds的话,刚好就可以切掉椭圆形外面的layer。得到如图所示的指示图。
-
首先第一步,先做一个椭圆形的view。
/** * 测试CAShapeLayer的drawRect属性 */ - (void)addTestDrawRect { UIView *view = [[UIView alloc]initWithFrame:CGRectMake(40, 200, 50, 100)]; view.layer.borderWidth = 0.5; view.layer.borderColor = [UIColor lightGrayColor].CGColor; view.layer.cornerRadius = 25; [self.view addSubview:view]; self.dynamicView = view; _dynamicView.clipsToBounds = YES; } -
第二步,给这个椭圆形的view加layer层。
/** * 调节控制音量条 */ -(void)refreshUIWithVoicePower: (NSInteger)voicePower{ CGFloat height = (voicePower)*(CGRectGetHeight(_dynamicView.frame)/TOTAL_NUM); [_indicateLayer removeFromSuperlayer]; _indicateLayer = nil; UIBezierPath *path = [UIBezierPath bezierPathWithRoundedRect:CGRectMake(0, CGRectGetHeight(_dynamicView.frame)-height, CGRectGetWidth(_dynamicView.frame), height) cornerRadius:0]; _indicateLayer = [CAShapeLayer layer]; _indicateLayer.path = path.CGPath; _indicateLayer.fillColor = [UIColor greenColor].CGColor; [_dynamicView.layer addSublayer:_indicateLayer]; } -
最后一步,完成。
三、画一个圆形的进度条
-
画一个圆形的进度条,首先要画一个圆形,然后是给这个圆环加动画。直接上代码吧。
  /**
   *  测试画圆形的进度条
   */
  - (void)addCycleProgress
  {
      UIView *view = [[UIView alloc]initWithFrame:CGRectMake(40, 350, 100, 100)];
      view.layer.borderWidth = 0.5;
      view.layer.borderColor = [UIColor lightGrayColor].CGColor;
      [self.view addSubview:view];
      self.demoView = view;

      CAShapeLayer *shapeLayer = [CAShapeLayer layer];
      shapeLayer.frame = _demoView.bounds;
      shapeLayer.strokeEnd = 0.7f;
      shapeLayer.strokeStart = 0.1f;

      UIBezierPath *path = [UIBezierPath bezierPathWithOvalInRect:_demoView.bounds];
      shapeLayer.path = path.CGPath;
      shapeLayer.fillColor = [UIColor clearColor].CGColor;
      shapeLayer.lineWidth = 2.0f;
      shapeLayer.strokeColor = [UIColor redColor].CGColor;
      [_demoView.layer addSublayer:shapeLayer];

      CABasicAnimation *pathAnima = [CABasicAnimation animationWithKeyPath:@"strokeEnd"];
      pathAnima.duration = 3.0f;
      pathAnima.timingFunction = [CAMediaTimingFunction functionWithName:kCAMediaTimingFunctionEaseInEaseOut];
      pathAnima.fromValue = [NSNumber numberWithFloat:0.0f];
      pathAnima.toValue = [NSNumber numberWithFloat:1.0f];
      pathAnima.fillMode = kCAFillModeForwards;
      pathAnima.removedOnCompletion = NO;
      [shapeLayer addAnimation:pathAnima forKey:@"strokeEndAnimation"];
  }
四、画一个有动画效果的进度条
- 这个进度条是分为两个部分的,第一部分是外面的圆形,第二部分是里面的对勾。然后分别加上动画即可。
五、画一个有波浪图的进度条
- 暂无介绍,有空再更。
六、项目最后放上代码DEMO